Getting Started
This page will help you install and build your first React Native app. If you already have React Native installed, you can skip ahead to the Tutorial.
このページは初めて React Native をインストールして、アプリケーションを作る人のための情報を提供します。すでにインストールしているひとは飛ばして、次のチュートリアルに進んでください。(このチュートリアル)
Quick Start
Create React Native App is the easiest way to start building a new React Native application. It allows you to start a project without installing or configuring any tools to build native code - no Xcode or Android Studio installation required (see Caveats).
Create React App は、新規のリアクト・ネイティブ・アプリケーションを作るうえで一番簡単な方法です。native コードをビルドするために、他のツールのインストールや設定がまったく必要ありません。Xcode も Android Studio もインストールする必要がありません。
Assuming that you have Node installed, you can use npm to install thecreate-react-native-appcommand line utility:
ただし、Node がインストールされており、npm をつかってコマンドラインから create-react-app をインストールできる必要があります。
では次のコマンドでインストールしていきましょう。
$ npm install -g create-react-native-app
Then run the following commands to create a new React Native project called "AwesomeProject":
以下のコマンドで、"Awesome Project"という名称の新規の React Native プロジェクトを作成しましょう。
$ create-react-native-app AwesomeProject
$ cd AwesomeProject
$ npm start
This will start a development server for you, and print a QR code in your terminal.
これで開発用サーバーが立ち上がり、QR コードがターミナルに表示されます。
Running your React Native application
Install theExpo client app on your iOS or Android phone and connect to the same wireless network as your computer. Using the Expo app, scan the QR code from your terminal to open your project.
クライアントアプリケーションの Expo をご自身の iOS もしくは Android にインストールして、使用しているコンピューターと同じワイヤレスネットワークに接続してください。Expo アプリを使って ターミナルに表示された QR コードをスキャンをしましょう。するとプロジェクトが端末上で展開されます。
Modifying your app
Now that you have successfully run the app, let's modify it. Open App.js in your text editor of choice and edit some lines. The application should reload automatically once you save your changes.
さてこれでアプリケーションを走らせることに成功しましたので、次は変更をくわえてきいきましょう。App.js をテキストエディターで開いて編集していきます。変更を加えると、自動的にアプリケーションがリロードされます。
That's it!
Congratulations! You've successfully run and modified your first React Native app.
おめでとうございます。最初の React Native アプリを走らせて、さらに変更を加えることに成功しましたね。
Now what?
次にどうすればいいか。
Create React Native App also has a user guideyou can reference if you have questions specific to the tool.
User guideがあるので、Create React Native Appに関して疑問があれば参照してください。
If you can't get this to work, see the Troubleshooting section in the README for Create React Native App.
うまくこのチュートリアルが動かなかった場合には、Troubleshooting を読んでください。
If you're curious to learn more about React Native, continue on to the Tutorial.
React Native について興味がうまれてもっと学びたいという場合には Tutorial を読み続けてください。
Running your app on a simulator or virtual device
作成したアプリケーションを、シミュレータもしくは仮想デバイス上で動かす
Create React Native App makes it really easy to run your React Native app on a physical device without setting up a development environment. If you want to run your app on the iOS Simulator or an Android Virtual Device, please refer to the instructions for building projects with native code to learn how to install Xcode and set up your Android development environment.
Create React Native App は、開発環境の設定をする必要がないので非常に簡単に、実際の物理デバイス上でアプリケーションを走らせることができます。ですが、アプリケーションを iOS シミュレータや Android の仮想デバイス上で動かしたい場合には、Xcode のインストールと Android 開発環境のセットアップに関する説明を読んでください。
Once you've set these up, you can launch your app on an Android Virtual Device by running npm run android, or on the iOS Simulator by running npm run ios (macOS only).
セットアップが完了しさえすれば、Android Virtual Device の場合には npm run androidと実行すればアプリケーションをその上で動かすことができます。iOS シミュレータの場合にはnpm run iosと実行してください。(ただし iOS シミュレータは macOS でしか提供されていません)
iOS シミュレータもしくは Android Virtual Device でアプリケーションを動かすための準備
Installing dependencies
You will need Node, Watchman, the React Native command line interface, and Xcode.
Node, Watchman, React Native command line interface, Xcode が必要です。
While you can use any editor of your choice to develop your app, you will need to install Xcode in order to set up the necessary tooling to build your React Native app for iOS.
開発に使うのは、どんなエディターでもかまいませんが、まず Xcode をインストールして、React Native app をビルドするのに必要なツールを用意する必要があります。
Node, Watchman
We recommend installing Node and Watchman using Homebrew. Run the following commands in a Terminal after installing Homebrew:
Node と Watchman のインストールには Homebrew をしようすることを推奨します。Homebrew をインストールした後に、以下のコマンドをターミナルで実行してください。
$ brew install node
$ brew install watchman
If you have already installed Node on your system, make sure it is version 4 or newer.
すでに Node をインストールしている場合には、そのバージョンが 4 以上であるようにしてください。
Watchman is a tool by Facebook for watching changes in the filesystem. It is highly recommended you install it for better performance.
Watchman は Facebook が開発したツールで、filesystem の変更を監視します。より良いパフォーマンスのために、このツールをインストールすることを強く推奨いたします。
The React Native CLI
Node comes with npm, which lets you install the React Native command line interface.
Node に付随している npm を使用して、React Native command line interface をインストールしましょう。
Run the following command in a Terminal:
以下のコマンドをターミナルで実行します。
$ npm install -g react-native-cli
If you get an error like Cannot find module 'npmlog', try installing npm directly: curl -0 -L https://npmjs.org/install.sh | sudo sh.
次のようなエラーが出る場合には Cannot find module 'npmlog'、npm をダイレクトにインストールしてください: curl -0 -L https://npmjs.org/install.sh | sudo sh.
Xcode
The easiest way to install Xcode is via the Mac App Store. Installing Xcode will also install the iOS Simulator and all the necessary tools to build your iOS app.
Xcode をインストールする一番簡単な方法は Mac App Store を使うことです。Xcode をインストールすると、同時に iOS Simulator と iOS app をビルドするために必要なツール一式もインストールしてくれます。
If you have already installed Xcode on your system, make sure it is version 8 or higher.
Xcode をすでにインストールしている場合には、バージョンが8以上であるようにしてください。
Command Line Tools
You will also need to install the Xcode Command Line Tools. Open Xcode, then choose "Preferences..." from the Xcode menu. Go to the Locations panel and install the tools by selecting the most recent version in the Command Line Tools dropdown.
Xcode Command Line Tool もインストールする必要があります。Xcode を開いて、"Preferences..." を Xcode のメニューから洗濯してください。Location パネルに移動し、Command Line Tools のドロップダウンから、一番最新のものを選択してインストールします。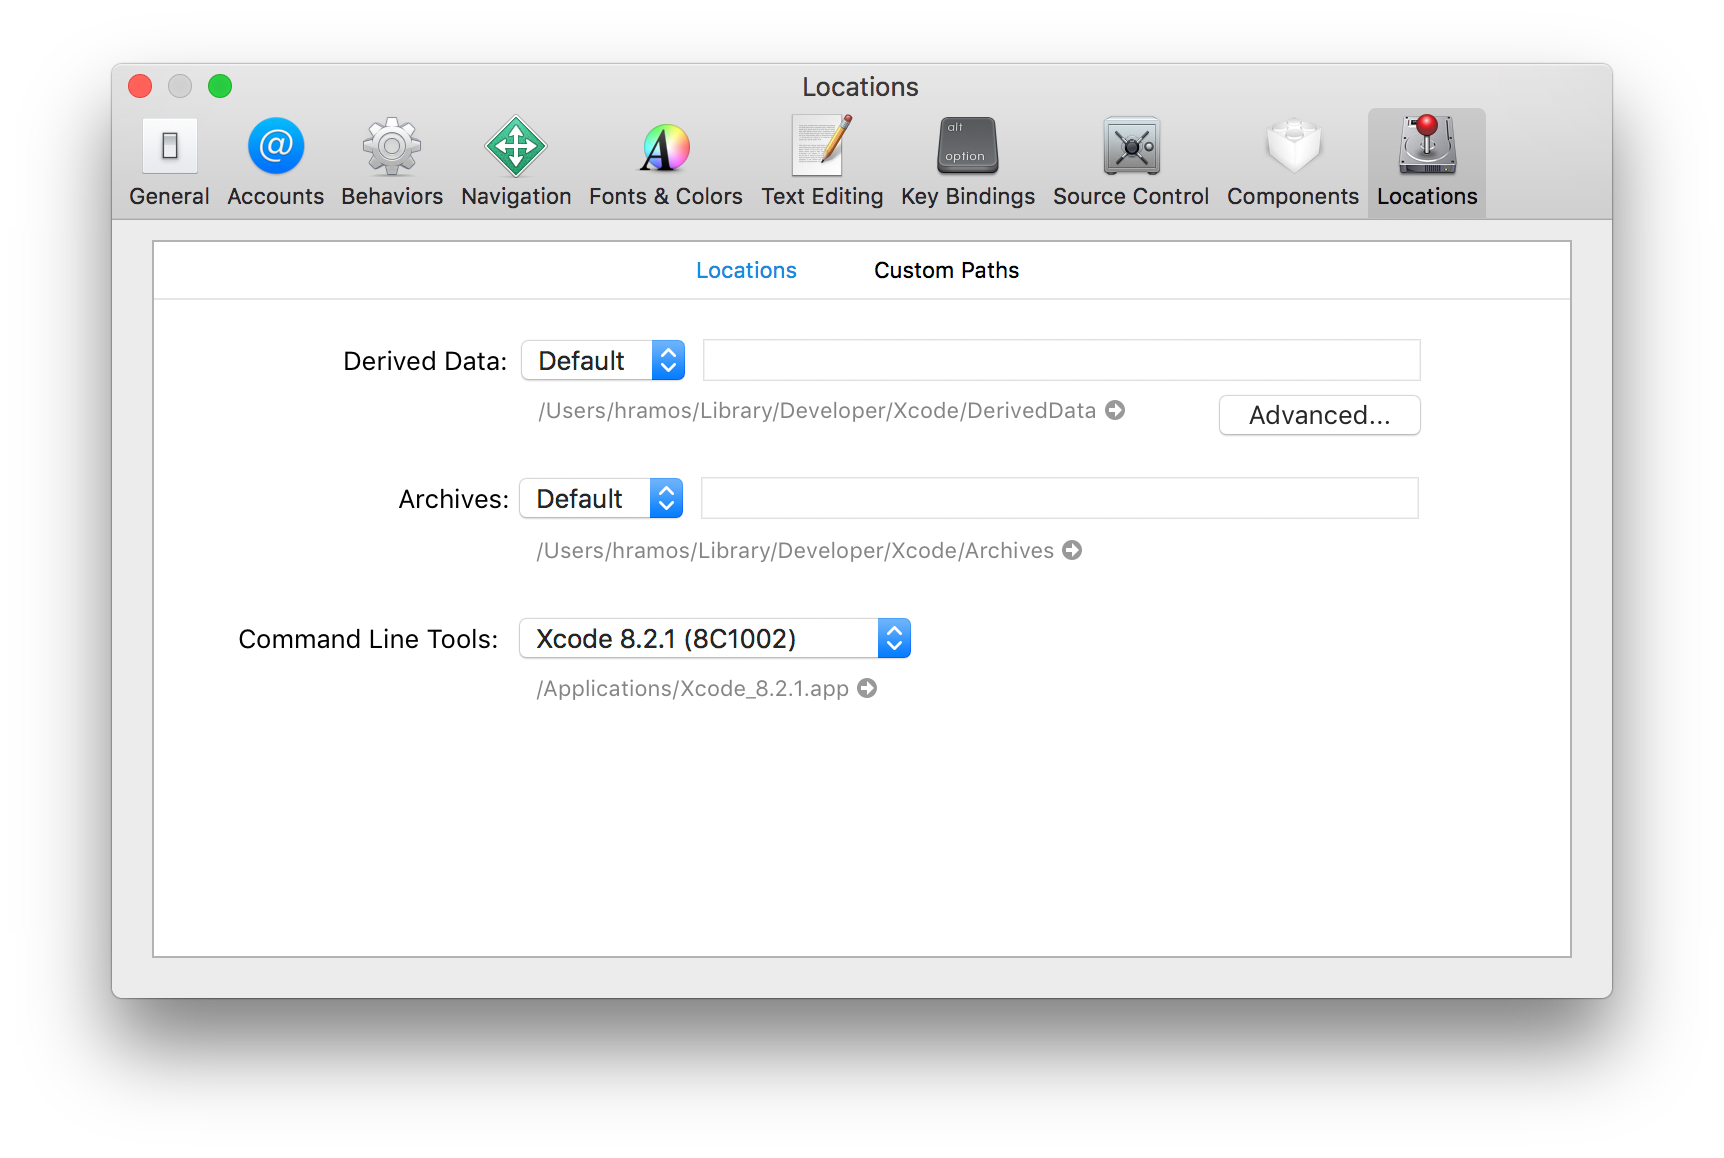
Caveats
Because you don't build any native code when using Create React Native App to create a project, it's not possible to include custom native modules beyond the React Native APIs and components that are available in the Expo client app.
If you know that you'll eventually need to include your own native code, Create React Native App is still a good way to get started. In that case you'll just need to "eject" eventually to create your own native builds. If you do eject, the "Building Projects with Native Code" instructions will be required to continue working on your project.
Create React Native App configures your project to use the most recent React Native version that is supported by the Expo client app. The Expo client app usually gains support for a given React Native version about a week after the React Native version is released as stable. You can check this document to find out what versions are supported.
If you're integrating React Native into an existing project, you'll want to skip Create React Native App and go directly to setting up the native build environment. Select "Building Projects with Native Code" above for instructions on configuring a native build environment for React Native.